Plan your website design project
Get all 6 free templates in the website design pack.
Start planningSign up for free with no time limit
Follow this step-by-step guide to learn the modern process of planning a website design project in Milanote, a free tool used by top creatives.
Before you begin choosing the fonts and images for your website, it's crucial to make a solid plan and answer some key questions... What's the purpose of the website? Who's the audience? What content should it have? What should it look like? The project plan helps your whole team understand the size and scope of your project before a single line of code is written. It ensures you and your client are on the same page through every step of the project.
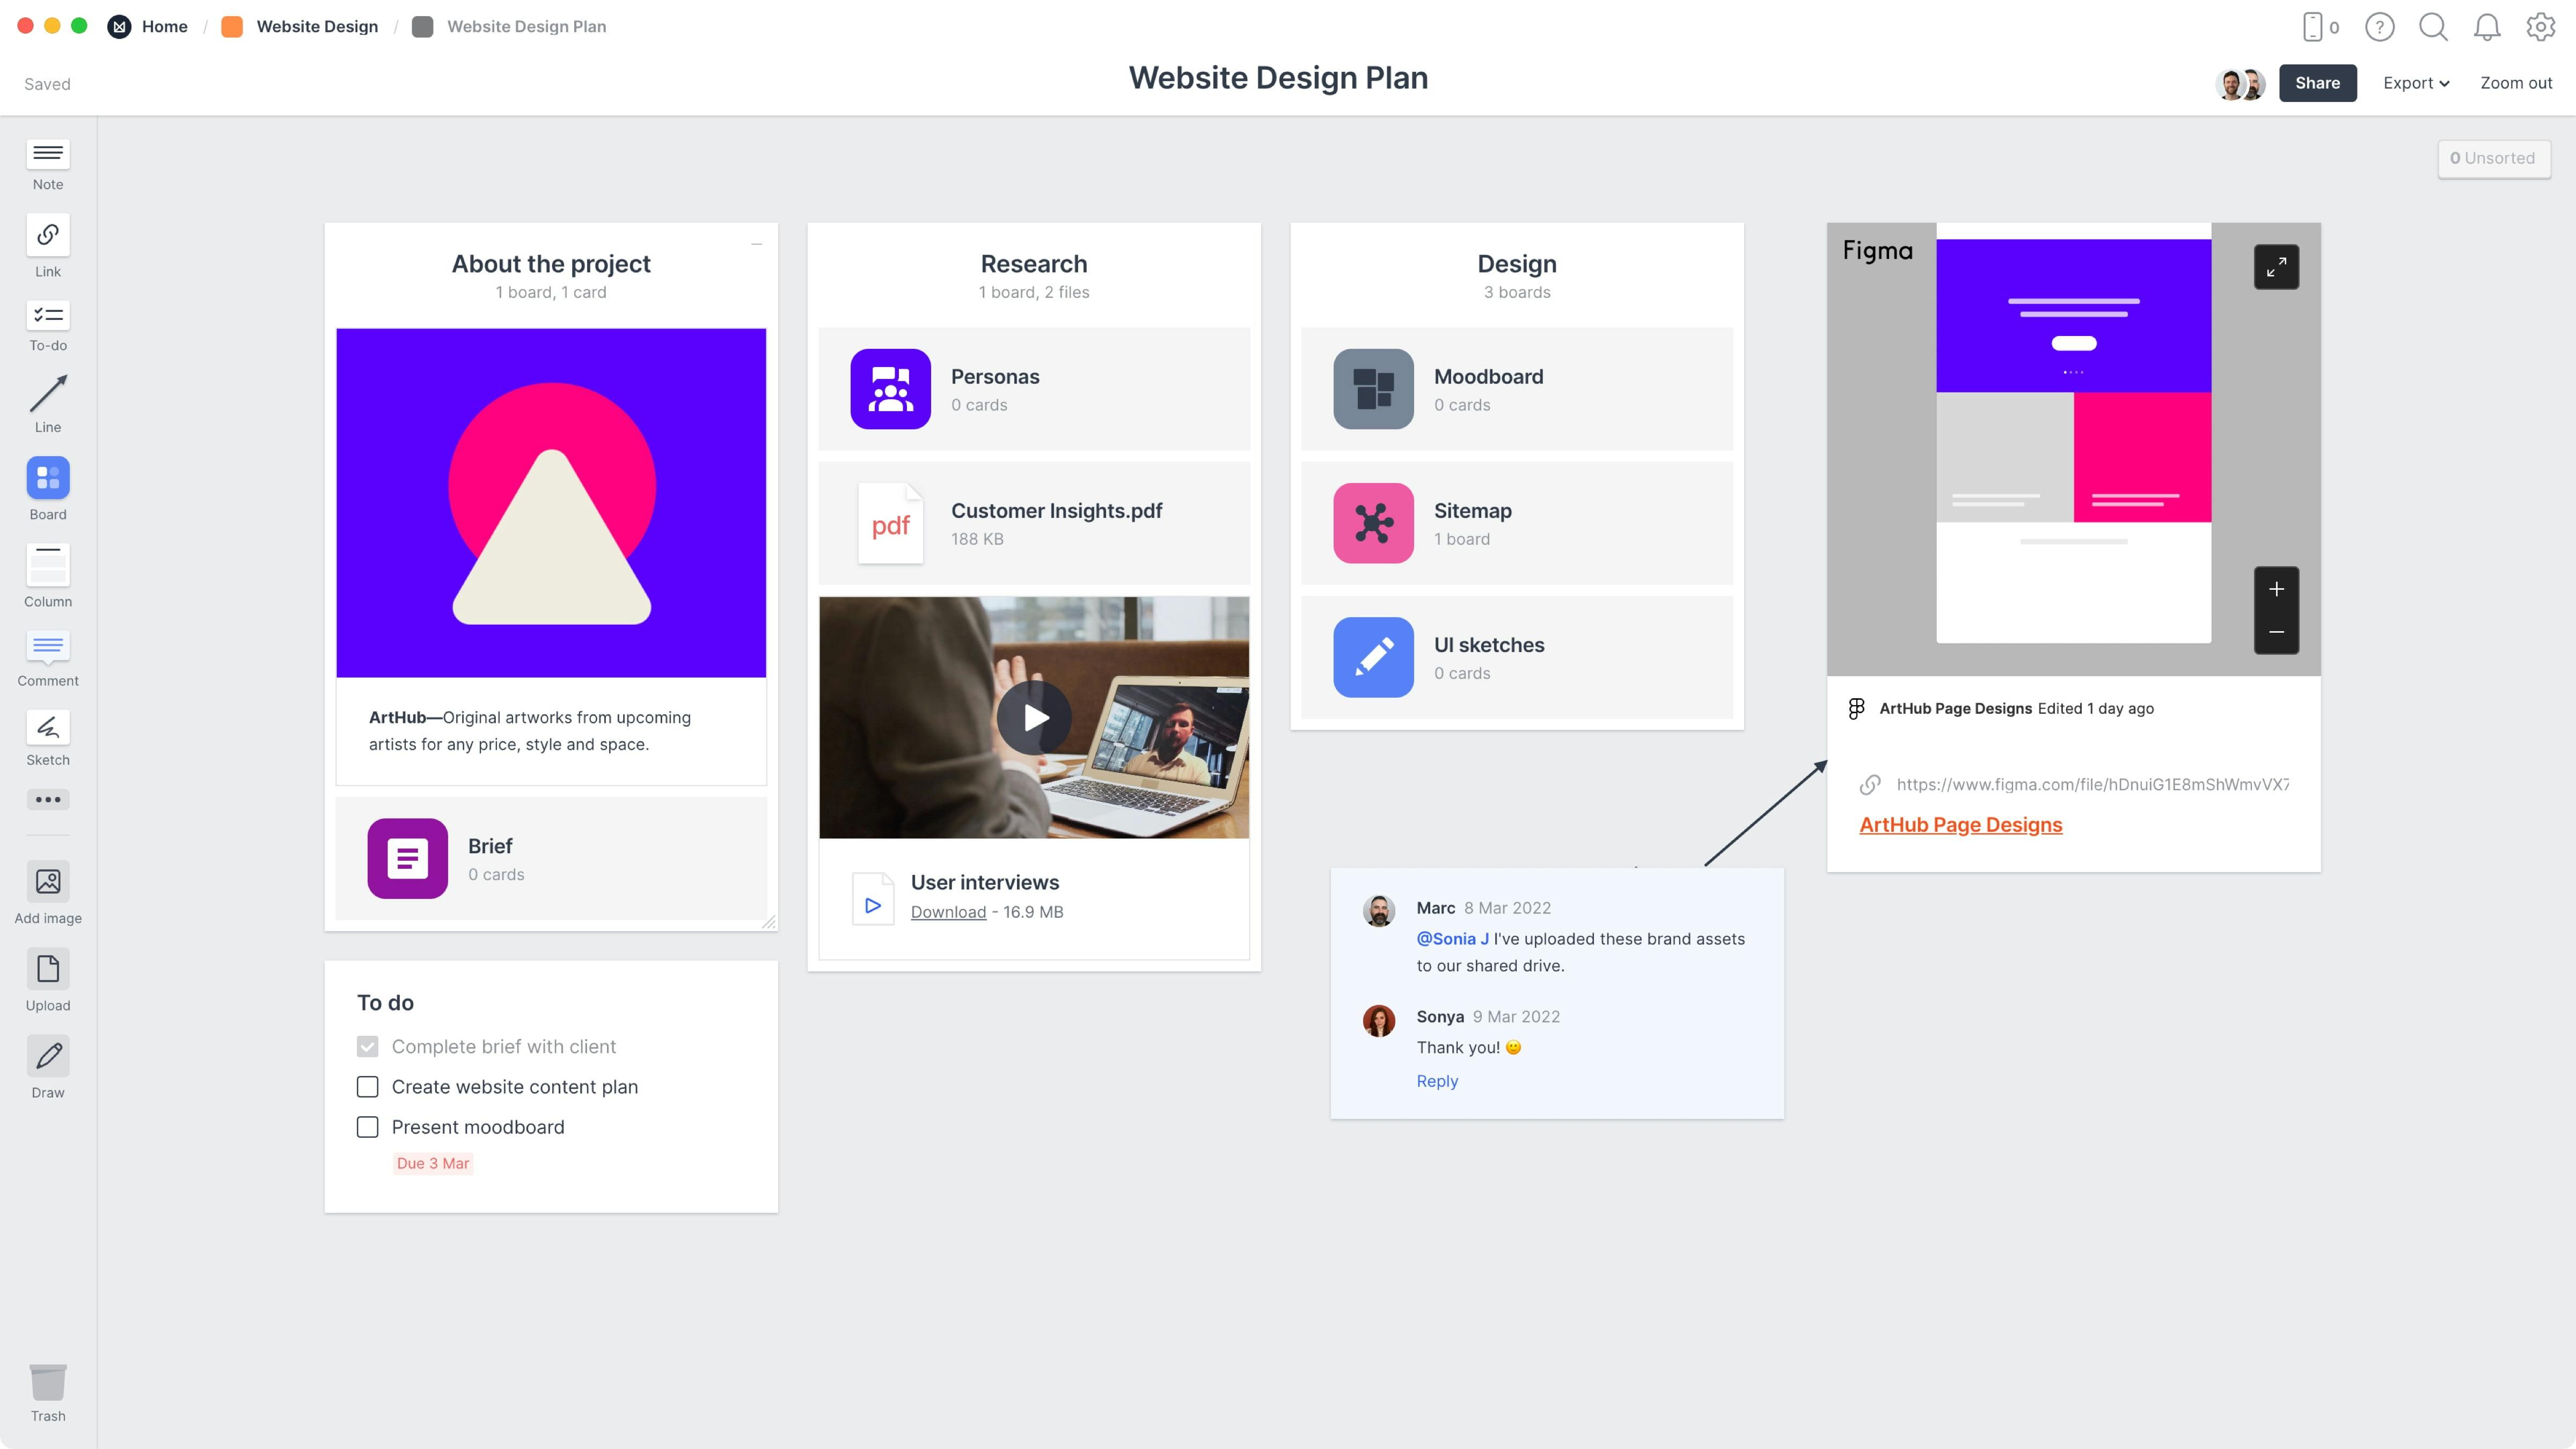
Traditionally, a project plan might be scattered across various emails, to-do lists, spreadsheets, and documents, making it hard to keep track of everything. A central project plan combines these artifacts into one easy-to-access place. It will evolve over the lifespan of your project but usually includes:

Create a new board for your project plan
Drag a board out from the toolbar. Give it a name, then double click to open it.
Choose the Website Design Plan template
Each new board gives you the option to start with a beautiful template.
It’s crucial to set a strong foundation from the start. A clear, inspiring, and informative brief provides the structure and direction for designers to do their best work. Website Design briefs typically include information about the brand/client, goals, specific deliverables, visual references, target audience, and important dates.

You’ll find the board to create your brief on the Project Plan board. Double-click the Brief to open it and start adding the goals, deliverables and defining the audience.

Double-click the Brief board to open it.
The first thing to define is why the project is happening. Spend time with your client, have them lead you through the vision in their own words and ask questions like... What problem is this project trying to solve? What lead up to it? What will change if this project is successful?

Add a note to describe the background.
Start typing then use the formatting tools in the left hand toolbar.
How will you know if the project is a success? Having a clear, realistic and measurable goal will help keep your team on the same page. For example, are you trying to increase inbound leads, or double the number of sales enquiries in 1 year? Alongside this, list any specific deliverables that will help you achieve your goal.

Add a to-do list to describe the deliverables.
Start typing then press "Enter" to create a new item. Add a title to your to-do list using the left hand toolbar.
Add any additional materials that will help your team get to know the brand. Describe the tone of voice, brand values, color, font, logo specs, and other related guidelines. This gives everyone easy access to important assets throughout the project and saves time hunting through emails and folders.

Drag brand files onto your board.
Click the "Upload" button or just drag a file onto your board. You can add images, logos, documents, videos, audio and much more.
Once you’ve made any final tweaks, it’s time to share the completed brief with your team or client, organize a kickoff meeting, and get started. If you want to learn more about writing a website design brief, check out our in-depth Website Design Brief guide.

Share the brief with your team.
Click Share in the top right of your board. You can add a Welcome message for viewers, allow comments, set a password or embed the board in another app or website.
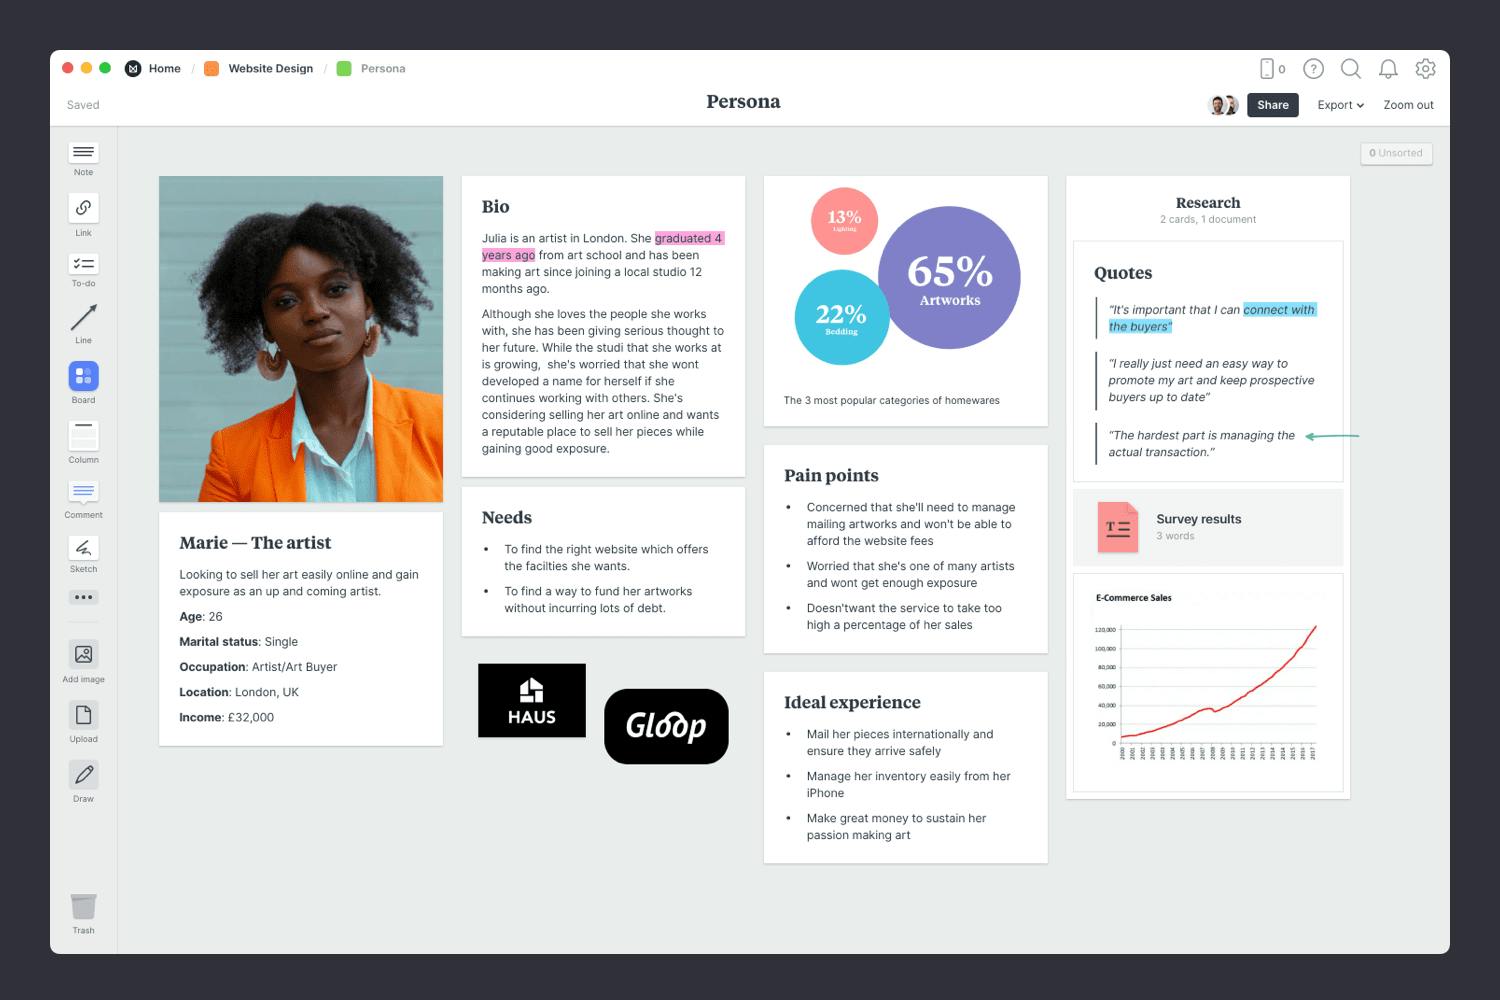
If you want to design a successful website, it's crucial to know who will be using it. That's where customer personas come in. Customer personas (or buyer personas) are fictional, composite characters that represent a segment of your audience—based on customer research. They're used by marketers, designers and creative teams to paint a clear picture of the target audience. They'll help you choose a design style and write content that will connect with your customers.
You’ll find this board on your Project Plan board. Double-click the Persona board to open it and start mapping out your ideal customer.

Double-click the Persona board to open it.
Choose the Persona template.
Each new board gives you the option to start with a beautiful template.
Good personas are built on real data and insights. They're a true representation of your ideal customer or a key segment, not a made-up character. There are usually many good sources of information available, including your website analytics, recent surveys or real-life conversations with customers. Quotes from actual customers can really help bring your research to life. Start by collecting it all in one place.

Drag files and documents from your computer.
Click the "Upload" button or just drag a file onto your board. You can add images, logos, documents, videos, audio and much more.
Defining your customer's pain points is extremely important, as removing these challenges will likely be the key to winning your customer's loyalty. Next, switch modes and describe the ideal experience. This is the creative part of the process. It's where you can set aside any current limitations and imagine the best experience for your persona.

Add notes to describe the pain points & ideal experience.
Start typing then use the formatting tools in the left hand toolbar.
Now it's time to start adding that carefully collected research. Authenticity is critical for developing empathy. Your persona needs enough detail to allow you to step into someone's shoes and see your products and services from their perspective.
Give your persona a real name and upload a representative photograph. Add in some basic demographic information such as age, marital status, occupation, location or income level as a snapshot.

Choose a photo to represent your persona.
Search over 3 million beautiful, free photos then drag images straight onto your board. Powered by Pexels.
Add notes to summarize your persona.
Start typing then use the formatting tools in the left hand toolbar.
Once you have everything you need, it's time to organize your content into logical topics. The goal here is to present the most important points in an inspiring and concise format. Highlight important parts, add titles and share it with your team or client so they can get to know who'll be using your website.
If you want to learn more about creating a customer persona, check out our in-depth Customer Persona guide.

Create a column to group related topics (like research).
Name it, then drag any relevant notes, images or boards into your column to stay organized.
Invite a team member or client to provide feedback.
Open the "Share" menu from the title bar of your board. Add email addresses of the people you'd like to collaborate with—they'll receive an invitation via email.
Next, it's time to start exploring some visual directions with a moodboard. Moodboards can help you visualize any aspect of your project. They can be literal and practical (featuring fonts, color schemes and images that you actually plan to use in the final design) or they can be more about exploring tone and mood. You can create a moodboard for each of these separately or mix them all into one board. There are no strict rules.

You’ll find the board to make your moodboard on the Project Plan board. Double-click on the Moodboard to open it and start adding inspiring references.

Double-click the Moodboard to open it.
Start by adding any existing material you have—this could include client references, positioning statements or images you've saved as inspiration. Just drag them onto your board. They might not make it into the final moodboard, but they're still a great place to start.

Drag files from your computer.
Click the "Upload" button or just drag a file onto your board. You can add images, logos, documents, videos, audio and much more.
The imagery you choose to include in your moodboard can have big influence on the look and feel of your project, so choose carefully! These images can define things like tone, cropping and color.
If you're the type of person who keeps a collection of images in an inspiration library, now's the time to see if you've already got something that could work. Or you can start by searching for visual elements from around the web. There are lots of fantastic sites where you can find great visual inspiration for free, like Dribbble, Behance and Designspiration.

Use the built-in image library.
Search over 3 million beautiful, free photos then drag images straight onto your board. Powered by Pexels.
Install the Milanote Web Clipper
Save images from other websites straight to your board.
With the Web Clipper installed, roll over an image (or highlight text), click Save, then choose the destination in Milanote. Return to your board and find the content in the "Unsorted" column on the right.
Once you have all your inspiration and color references in one place, the next step is to arrange your ideas to create the perfect composition. Start by exploring composition and introducing hierarchy. Place a key element such as a logo to anchor your board, and change the size and position of the remaining elements to indicate their importance and relationships to one another.
When you're ready, share it with your team or client and ask for their feedback and ideas.

Resize your images to add hierarchy.
Drag the corner of an image to resize it. Double-click the corner to return it to its original size.
Invite your team or client to collaborate
Open the "Share" menu from the title bar of your board. Add email addresses of the people you'd like to collaborate with—they'll receive an invitation via email.
Now that your moodboard is complete, you have a powerful starting point for your webiste design project. Remember, you can create multiple moodboards to explore different visual directions at any time.
Next, we'll start mapping out the structure and content for each section on the website.
Sitemaps are the perfect way to plan the content and structure of your website. Designers, copywriters and marketers use them to map out website categories before jumping into the interface design phase. They become an invaluable reference for the whole team when estimating how much work is involved to build the website.

You’ll find the Sitemap board on the Project Plan board. Double-click to open it and start planning the categories and structure of your website.

Double-click the Sitemap board to open it.
What type of content do you need to include on your website? Get together with your team or client and start adding content ideas. This is the time to get creative—add as many ideas as you can. Consider what's most important to your users as well. Are there insights from recent customer research or surveys you've run?

Drag out a board for each category on your website.
Drag a board out from the toolbar. Give it a name, then double click to open it.
Once you've added your content ideas, it's time to start organizing them into groups. The easiest way to do this is to visually group similar content together. Just drag and drop content into clusters. Themes will start to emerge naturally. You can also use color to help unify each group of content.

Drag boards into clusters.
Select a board, then choose the color option in the left toolbar.
There are a few different ways you can structure your website content, but the most common is the tree structure, which we'll use in this example. Start by moving your homepage to the top of your board. All your content categories will fall below home. Next, move your content categories under home and start to tidy things up. Lastly, use arrows to show the relationship between content.

Drag lines from one board to another to show relationships.
Select an object, then drag the arrow from the top right. Connect the line to another object to create a quick diagram.
Your sitemap is a great way to visually explain the hierarchy of your website to your team. Now you have the perfect birds-eye view of how your website fits together. Next, we'll start mapping out the actual content for each page.
A great content plan is the most important step in creating an engaging website. It's where you map out the copy, imagery and structure you need so your team knows what to design and build.

Choose a page on your sitemap that you'd like to plan the content for. Double-click the board to open it and start adding ideas, images and planning the structure.

Double-click a board to open it.
Start adding ideas for the written content that might appear on this page. It doesn't have to be the final copy but it will give everyone a feel for what you're aiming to communicate. Think about the key messages you want to communicate, sub-titles and even SEO keywords you need to include. Don't worry about the structure of it yet—just get it out of your head!

Add notes to explore ideas for content.
Start typing then use the formatting tools in the left hand toolbar.
If you have a picture in your head of head of how the page could be structured, grab a pen and sketch it out. Even if it's just some boxes and arrows, it's a great way to figure out which messages are more important than others. A simple sketch is also a useful reference for the developers who will need to build the website.

Click the Pen tool and sketch a rough page layout.
Click Draw in the lefthand toolbar to sketch anywhere on a board. Press Save to commit a sketch.
Next, think about the images that would suit this page. Again, these don't have to be the final images, but they'll help bring it to life. You can use images from the web or open Milanote's built-in image library to quickly find inspiring examples.

Choose example images from the image library.
Search over 3 million beautiful, free photos then drag images straight onto your board. Powered by Pexels.
Embed video from Youtube.
Copy the share link from Youtube, Vimeo, Soundcloud or many other services. Drag a link card onto your board, paste your link and press enter.
Whether you're working on a client project or collaborating with a team it can be helpful to bounce ideas off other people. As writer Louisa May Alcott said, "It takes two flints to make a fire."
A collaborative content plan is especially helpful for this step as you can easily connect and work together online. Bringing everyone onto the same page (figuratively and literally!) in real-time allows you to collaborate on copy, images and layout allowing you to create a coherent and engaging website.

Invite someone else to edit to your board.
Open the "Share" menu from the title bar of your board. Add email addresses of the people you'd like to collaborate with—they'll receive an invitation via email.
Hopefully, this guide has helped you and your team better plan the design and content for your website. If you're just starting a new website, use the Website Design Plan template below to get set up in minutes.